
How to Optimize Minecraft 1.7.10-1.12.2 for M1
LWJGL 2 was used in older versions of Minecraft, which prevented people from optimizing Minecraft 1.7.10-1.12.2 for M1. Thanks to the work of Tanmay Bakshi and 17hoehbr on GitHub, this is now possible. This tutorial will be rather similar to How To Optimize Minecraft for M1 (Java Edition), so please follow that tutorial before doing this one, as I will not be going over how to set up MultiMC. This tutorial will work for versions below 1.7.10, but they may have some discoloration issues.
Step 1: Installing Java 8 to Optimize Minecraft 1.7.10-1.12.2 for M1
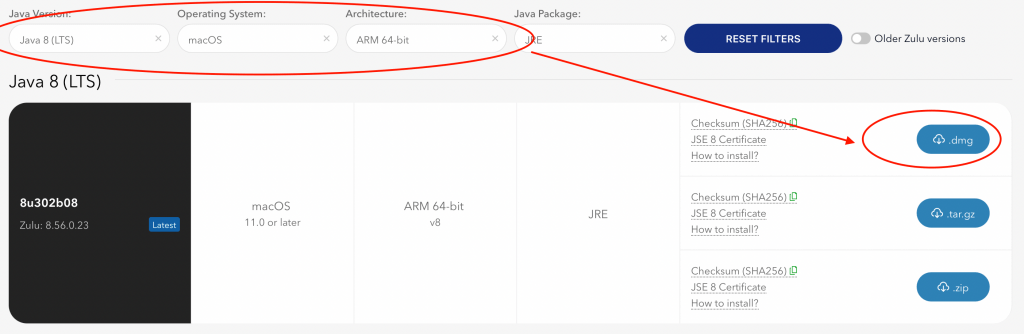
These older versions of Minecraft use Java 8, unlike Java 11 that we used for the 1.13-1.16 tutorial, or Java 16 that we used for 1.17. Go download Java 8 from Azul here: https://www.azul.com/downloads/?package=jre. You will want to select Java 8 (LTS) as the Java version, then macOS as the Operating System, and ARM 64-bit as the architecture. Then download the .dmg file.
Once the .dmg file is downloaded, open it and then click on the .pkg. You may have to go to System Preferences > Security & Privacy > Open Anyway to allow macOS to run the file. Now, go through the wizard and install Java 8.
Step 2: Downloading the Patches
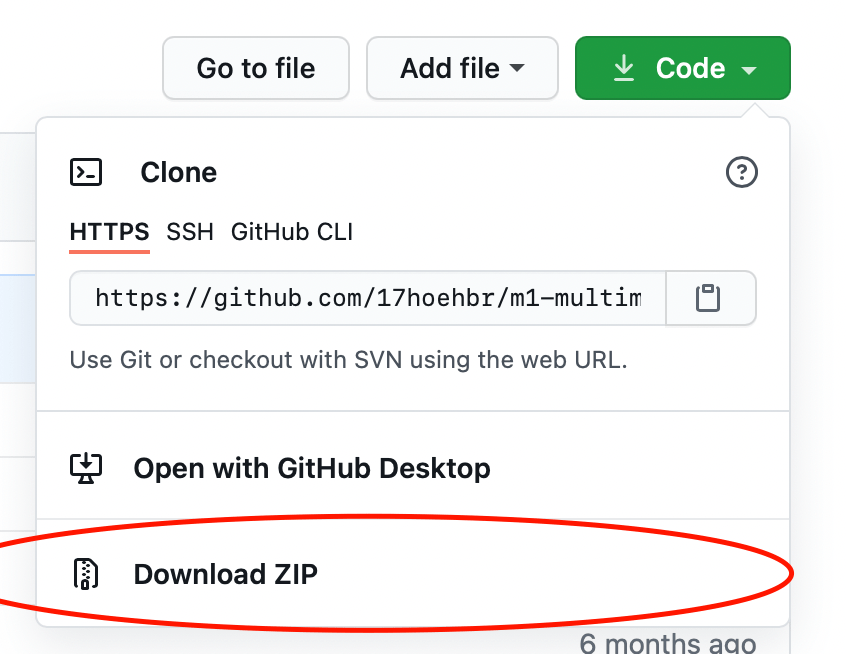
In order to optimize Minecraft 1.7.10-1.12.2 for M1, you must install a patch created by 17hoehbr. Download the .zip file for the patch by going to https://github.com/17hoehbr/m1-multimc-hack. Then, click on the green Code button on the top-right and then click Download Zip.
Now, go ahead and extract the zip file and place rename the extracted folder to “old”. Place this folder in the original m1-multimc-hack directory in the Documents folder you made in the first tutorial. Now, all you have to do is configure the multimc instance.
Step 3: Configure the MultiMC instance.
The next step to optimize Minecraft 1.7.10-1.12.2 for M1 is to set up the MultiMC instance. Go ahead and create an instance with the version you want to use. Now, right-click on the instance and click “Edit Instance” and go down to Settings.
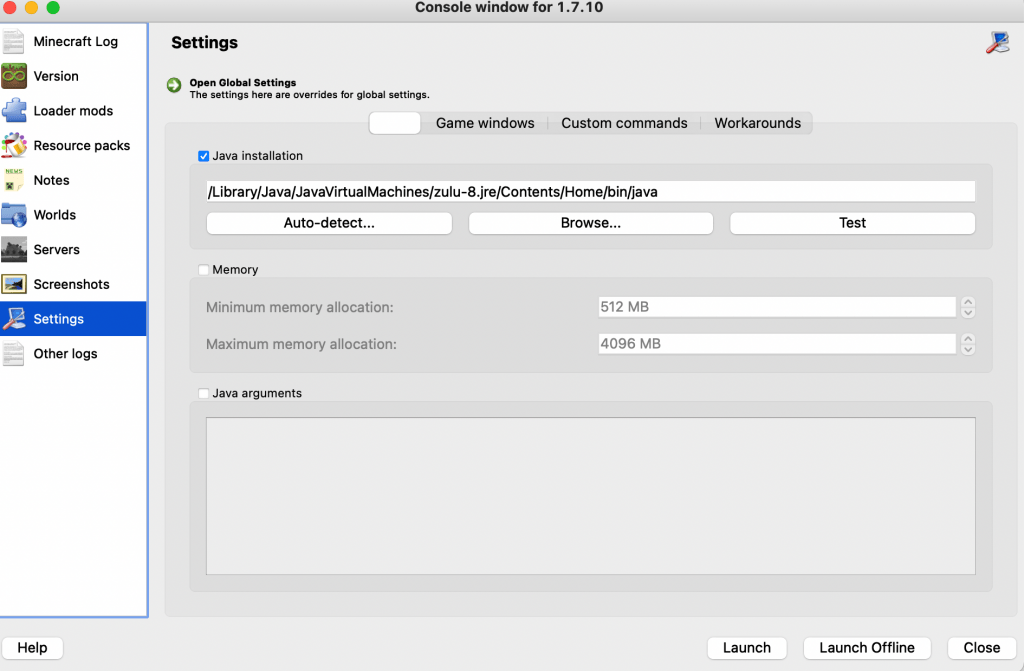
Click the check next to the Java installation, and enter the following path in the text box it opens up:
/Library/Java/JavaVirtualMachines/zulu-8.jre/Contents/Home/bin/javaNow, on the top click Custom Commands. Check the box and go to the Wrapper Command field. Type this:
/Users/frank/Documents/m1-multimc-hack/old/mcwrap.pyYou should now have successfully optimized Minecraft 1.7.10-1.12.2 for M1. Press “Launch,” and Minecraft should boot up.


Could you do one for the beta versions of Minecraft?
That’s a bit of a tall order. Anything below release 1.6 uses an ancient version of lwjgl that will mess with the game’s colors in weird ways. This tutorial works for those versions (not sure about Beta), but the color issue sadly still exists even if it is optimized.
no sound ? why ?
please help, i want play a 1.7.10 only mod.
Please join the Info Toast Discord and we’ll see what we can do. https://discord.gg/rftS5NA
I tried this tutorial, and while it does work; 1.8.9 tends to crash when you resize the window, and it also does the same using Rosetta 2.
This is not a problem with M1, this is a problem with newer macOS versions.